It has been a while since I've posted about Agile PLM stuff.. In this post I'll go through implementing and configuring an Oracle Agile PLM Web Proxy Server. Previous related posts: Agile PLM 9.2.2.1 - Part I - Introduction
Agile PLM 9.2.2.1 – Part II – Database Node Installation
Agile PLM 9.2.2.1 – Part III – Application Node Installation
First, who needs a Web Proxy server for Agile PLM? In order to make Agile PLM accessible to external users, a Web Proxy server should be installed to allow connections from the internet.
This solution include a new server on DMZ behind a firewall which forwards calls to the internal Agile application server.
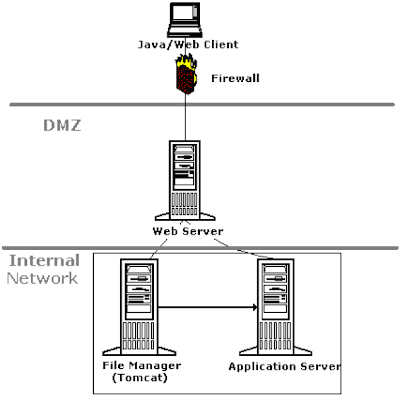
(* Image from Oracle Agile documentation) The Agile Web Proxy Server installation consists of the following steps: - Installing and Configuring the IIS
- Install the Agile Web proxy files on the IIS server in the DMZ
- Configuring IIS as a Proxy Server for Agile PLM
- Configuring IIS as a Proxy Server for Agile File Manager
- Create new external File Manager
Now I'll show a detailed procedure to install Agile Web Proxy Server on Windows using IIS (Microsoft Internet Information Server).
*** When installing on Unix/Linux OS you'll use Apache as the web proxy server. Installing and Configuring the IIS - Install IIS on the new Agile Proxy Server (will be called agiledmz)
- Login to agiledmz server with administrator user
- Navigate to: Start -> Administrative Tools -> Internet information services (IIS) Manager
- Right click on Web Sites -> new -> Web Site -> Next

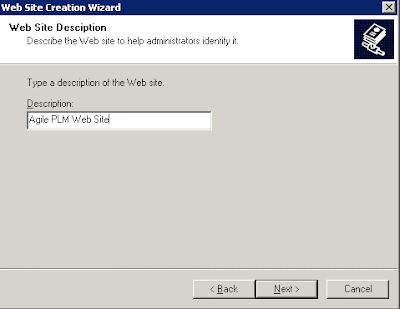
 - Enter description: Agile PLM Web Site -> Next
 - Enter the following:
Ip: All unussigned
port: 80
host: null -> Next
 - Path: C:\Inetpub\wwwroot -> Next
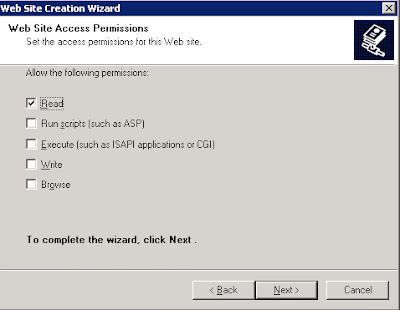
 - Check the Read option only -> Next
 - Click Finish
- Right click on Agile PLM Web Site -> properties
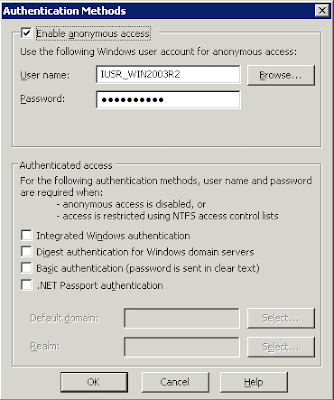
- Select tab Directory Security -> Under 'Authentication and Access Control' click on Edit -> Uncheck the 'Integrated Windows authentication'
 - Disable the default Web Site: Right Click on Defaule Web Site -> Stop
Install the Agile Web proxy files on the IIS server in the DMZ - Make sure IIS is up and running (Go to services screen - services.msc - and check that "IIS Admin Service" process is in Started state)
 - Execute setup.exe from [INSTALLATION_BASE_DIR]\PN00168\Windows directory
 - Click Next -> accept the license -> Next
 - Enter User name, Company name and License key -> Next
 - Check the Web Proxies only -> Next
 - Specify directory on which agile files will be installed (D:\Agile\Agile9221)-> Next
 - Select Oracle Application Server 10g -> Next
 - Enter the Web Proxy server name (or IP) and port (80) -> Next
 - Enter the server name and port on which Agile application is installed (The Agile Application Server) -> Next
 - Keep the default "Agile" for Agile Application Server Virtual Path-> Next
 - Keep the default "Use internal user account (ifsuser)" -> Next
 - Keep the default "Filemgr" for Agile Primary File Manager’s Virtual Path -> Next
 - Enter Agile's File Manager host name and port (might be the same as Agile Application Server)-> Next
 - Click on Install
- Click on Done
Configuring IIS as a Proxy Server for Agile PLM - Navigate to: Start > Administrative Tools > Internet Information Services (IIS) Manager
- Right click on Agile PLM Web Site -> properties
- Click the Home Directory tab -> update the execute permissions to Scripts and Executables
 - Click the ISAPI Filter tab -> click Add
- Filter name: oproxy , Executable: D:\Agile\Agile9221\AgileProxies\oracle_proxy.dll -> Ok -> Ok
 - Right click on Agile PLM Web Site -> New -> Virtual Directory -> Next
 - Alias: oproxy -> Next
 - Path: D:\Agile\Agile9221\AgileProxies -> Next
 - Check the Read and Execute -> Next -> Finish
 - Select the Web Service Extensions -> Select the All Unknown ISAPI Extensions -> Click Allow -> Click Yes
 - Close IIS Manager window
- Restart IIS from services screen
- Right Click on Agile PLM Web Site -> properties -> select the ISAPI Filters tab -> you should see a green arrow pointing up for oproxy.
 Configuring IIS as a Proxy Server for Agile File Manager - Login to the File Manager server
- Note the Connector Port number from [AGILE_HOME]\Tomcat\conf\server.xml
<!-- Define a Coyote/JK2 AJP 1.3 Connector on port 8009 -->
<Connector port="8009" enableLookups="false" redirectPort="8443" debug="0" protocol="AJP/1.3"/> | -
Edit jk2.properties from [AGILE_HOME]\Tomcat\conf
Add the following line at the end and save the file:
- Login to agiledmz - (The Web Proxy Server)
- Navigate to: Start > Administrative Tools > Internet Information Services (IIS) Manager
- Right click on Agile PLM Web Site -> properties
- Click the ISAPI Filter tab -> click Add
- Filter name: Jakarta IIS Connector , Executable: D:\Agile\Agile9221\AgileProxies\isapi_redirect.dll -> Ok -> Ok
 - Right click on Agile PLM Web Site -> New -> Virtual Directory -> Next
 - Alias: Jakarta -> Next
- Path: D:\Agile\Agile9221\AgileProxies -> Next
- Check the Read and Execute -> Next -> Finish
 - Open the workers.properties file in [AGILE_HOME]\AgileProxies and make sure the File Manager server is correct in the following entry:
| worker.ajp13w.host=<File Manager host name> | - Restart IIS
- Right Click on Agile PLM Web Site -> properties -> select the ISAPI Filters tab -> you should see green arrows pointing up for both oproxy and jakarta.
 Create new external File Manager - Open the Agile Java Client
- Select 'Admin' Tab -> expand 'Server Settings' -> open 'Locations'
- Select the 'File Manager' tab -> click on the 'new' icon (you must have license for unlimited File Managers to enable it)
- Enter the following:
Name - iFS_External
File Manager URL - Use the web proxy server name (registered on the web) or IP, e.g. http://agile.company.domain/Filemgr/AttachmentServlet or http://111.11.11.111/Filemgr/AttachmentServlet
Enabled - Yes
Primary File Server - No
 - Click on 'Ok'
- Expand the 'User Settings' -> open 'Users' -> find the user you want to use the external iFS and open his settings -> select the 'Preferences' tab -> update the 'Preferred File Manager' to 'iFS_External'.
 *** Important Note
Agile architecture compels you to configure specific File Manager for each user.
Users configured to use the internal iFS will be able to utilize the File Manager from within the network only! They'll be unable to utilize the external iFS when login to Agile through the Agile Web Proxy Server.
The same behaviour for users configured to use the external iFS - They will be able to utilize the external iFS only.
Now you can login to agile from the internet through the Agile Web Proxy Server.
Use the following URL to get the login screen:
http://[Agile Web Server Proxy IP or Name]/Agile/PLMServlet Next post I'll show how to secure connections to Agile through the Proxy server using SSL (https) connection. You are welcome to leave a comment and/or share your experience with Agile installation. Aviad | 


