Monday, December 24, 2007

Agile PLM 9.2.2.1 – Part II – Database Node Installation

Following my last post about Agile PLM 9.2.2.1 – Part I, in this post I’ll show, step by step, how to install Agile PLM 9.2.2.1 system.

The latest version of Agile PLM is 9.2.2.2, but it's too much new to install it for production..

I installed the Agile PLM 9.2.2.1 on 2 nodes configuration:

1) Agiledb – Oracle Database server Node
C:\ drive – OS only
D:\ drive – Database 10g software and Datafiles

2) Agileapp – Agile Application + IIS + Oracle AS + Agile File Manager Node
C:\ drive – OS only
D:\ drive – Agile 9.2.2.1 applications + Oracle AS
E:\ drive – File Vault (managed by the File Manager)

** Both servers installed with Windows 2003 Server OS.

This post will describe all phases of database node installation, and next post I’ll describe the application node installation.

The Agile Database node installation composed from the following steps:
- Complete all database installation pre requisites
- Oracle Database 10.2.0.1 installation
- Oracle Datbase companion installation
- Agile Database creation
- Listener configuration

Database Node Installation - Pre Requisites

1) If server is DHCP configured you should setup a loopback (10g installation requirements)
a. Control panel -> Add hardware


b. Choose: Yes, I have already connected the hardware


c. Choose: Add a new hardware device (the last item on list)
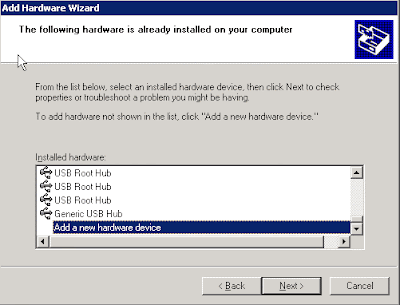

d. Choose: Install the hardware that I manually select from a list


e. Choose: Network adapters


f. Choose at the left side: Microsoft at right side choose: Microsoft loopback adapter


g. Edit the server host file at c:\windows\system32\driver\etc\hosts
Add the following line:
10.10.10.10 agiledb.domain agiledb


h. Navigate to network connections: Start -> settings -> Network Connections
i. Right Click on Local Area Connection – Microsoft Loopback Adapter -> properties


ii. Select TCP/IP -> properties


iii. Edit the ip address to 10.10.10.10
iv. Edit the subnet mask to 255.255.255.0


2) Restart the server


Oracle Database 10.2.0.1 installation

1) Run database installer – setup.exe (from database directory)
2) Select Basic installation – Standard Edition
a. Oracle Home Location: d:\oracle\product\10.2.0\db_1
b. Uncheck the Create Starter Database


3) Review prerequisite checks


4) Click on Install…


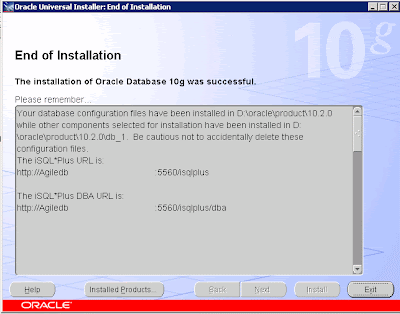
5) Exit


Database Companion Installation

1) Run the installer – setup.exe (from companion directory)
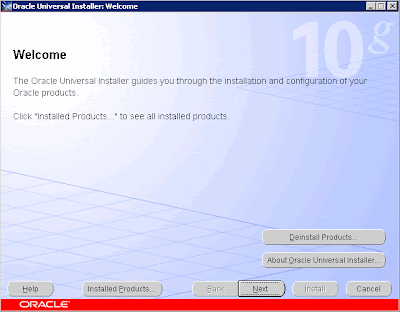

2) Select Oracle Database 10g Products 10.2.0.1.0


3) Specify Home details:
a. Name: OraDb10g_home1
b. Path: D:\oracle\product\10.2.0\db_1


3) Review prerequisite checks


4) Install…


5) Exit


Agile Database Creation

1) Copy the “Platform” directory from Agile Disk2 directory to Agile Disk1 directory to the setup.exe level


2) Run [Disk1]:\windows\setup.exe


3) Accept license agreement
4) Enter the license key and user name.


5) Select : Database Server only
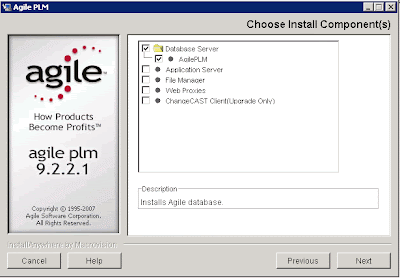

6) Enter the location to install the selected Agile 9.2.2.1 components:
D:\agile\agile9221


7) Select Oracle 10g Database Server


8) Install


9) Destination folder for database customization files: d:\Agile9Tmp


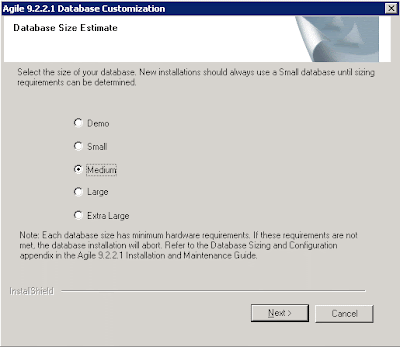
10) Select “Medium” Database size
For more information regarding each possibility - small, medium, large... - read the Capacity Planning Guide

11) Select the previous installed oracle home


12) Oracle SID: agile9


13) Enter passwords for Sys and System and user name and password for Agile schema.

14) Click some next’s…


15) Agile installation will create the database


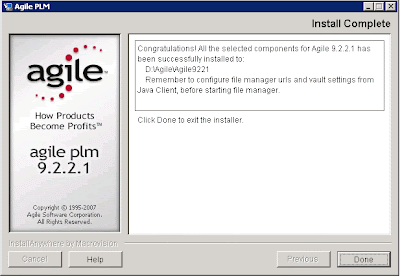
16) Done


Configure Database Listener

1) Navigate to: Start Menu -> Programs -> Oracle - OraDb10g_home1 -> Configuration and Migration Tools -> Net Manager


2) Create new Listener, Name: Listener


3) Select Database Services from the drop down list
a. Click on Add database
b. Global Database Name: Agile9
c. Oracle Home Directory: d:\oracle\product\10.2.0\db_1
d. SID: agile9


4) File -> Save Network Configuration
5) Restart the Listener
a. Lsnrctl stop
b. Lsnrctl start


That’s all for the Agile Database node.
Next post I’ll show the Agile 9.2.2.1 Application node installation.

For more information:
Capacity Planning Guide
OracleAgile Database Installation Guide

You are welcome to leave a comment.
Aviad

Tuesday, December 18, 2007

Agile PLM 9.2.2.1 - Part I

In May this year, Oracle has acquired Agile, a leading provider of Product Lifecycle Management (PLM) software solutions.

In this post I will explain about the various components of Agile PLM system, and the following posts will be dedicated to Agile PLM installation.

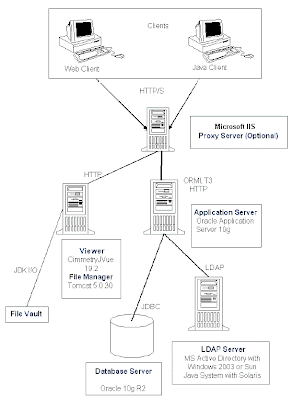
The components of Agile PLM application are:
1) Agile Database
2) Agile Application Server
3) Agile File Manager
4) Agile Web Proxies
These components should be installed in the above order.

Agile Database
Used to hold all Agile data.
It is recommended to install the database and application server on separated machines.

Agile Application Server
The Agile Application Server can be run on Oracle Application Server 10g or BEA WebLogic Server.
The Application Server is the main component of the Agile system, all services and business logic reside on it.
The Agile application deployed on the Application Server.
All users (Java/Web clients) connect to the Application Server in 2 possible ways:
- Directly
- Indirectly, via Wev proxy Server.

Agile File Manager
The File Manager manages all Agile files in the file system (File Vault).
The File Manager runs on Tomcat.

Agile Web Proxies Server
The Agile web client allows connection to both internal and external users.
Agile web client uses Microsoft IIS (Internet Information Services) or Apache web server.
The Agile web client connects to an Agile Application Server the same way like other Agile Application Server clients.


Next post I will show, step by step, how to install Agile PLM 9.2.21 on two nodes configuration.

Aviad

Tuesday, November 20, 2007

Data Auditing in Oracle Applications - Audit Trail

Following my last post about Audit users in Oracle Applications, in this post I’m going to talk about the Audit Trail - the data auditing feature in Oracle Applications.
The AuditTrail enable us to know who, when and what was changed on each table we would like to audit.
For example: Some of the profiles in Oracle Applications are very critical and important for normal activity of the system (like MO: Operating Unit).
We might be interested to know who changed the value of critical profiles and the Audit Trail certainly can help us.

Now I’ll show a step by step demo how to start Audit Trail on a table, I will go on with my previous example on the profiles table.
The table we would like to audit is FND_PROFILE_OPTION_VALUES.

1) Logon to system with System Administrator responsibility.

2) Make sure the profile “AuditTrail:Activate” is set to Yes

3) Check the audited table's owner
select owner
from dba_tables
where table_name like 'FND_PROFILE_OPTION_VALUES';

The owner is APPLSYS.

4) Check that audit is enabled for APPLSYS user
Go to: Security -> AuditTrail -> Install -> Query for APPLSYS


5) Define new Audit Group
Since the audit enabled on groups of tables, we should define a new Audit Group which will contain the FND_PROFILE_OPTION_VALUES table.

Find the table’s application name by this query:
select fav.application_name
from fnd_application_vl fav, fnd_tables ft
where fav.application_id = ft.application_id
and ft.table_name = 'FND_PROFILE_OPTION_VALUES';

The query result: Application Object Library

Navigate to: Security -> AuditTrail -> Groups

Application: Application Object Library
Audit Group: AC FND Profile Values Audit
Group State: Enable Requested


At this level, the columns that will be audited are the columns of the primary key or the first unique index on the audited table.
You can add columns to be audited as much as you want.

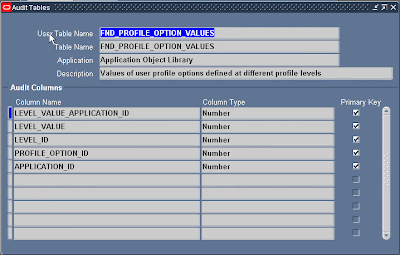
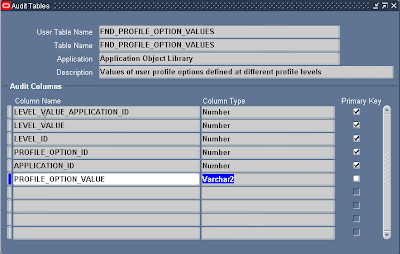
6) Check/Add column to audit
Navigate to: Security -> AuditTrail -> Tables
Query for FND_PROFILE_OPTION_VALUES table.


Add column PROFILE_OPTION_VALUE to be audited.


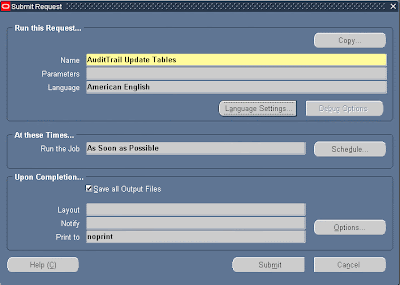
7) Run the “AuditTrail Update Tables” concurrent to enable the audit
Navigate to: Requests -> Run -> Single Request -> choose request name: “AuditTrail Update Tables” -> Submit


All definitions we made until here will not take effect until we execute this concurrent.
This concurrent will create all objects (triggers and procedures) required for audit, and views to retrieve the audited data.

This request should be executed each time we make changes in audit definitions, to generate new audit objects.

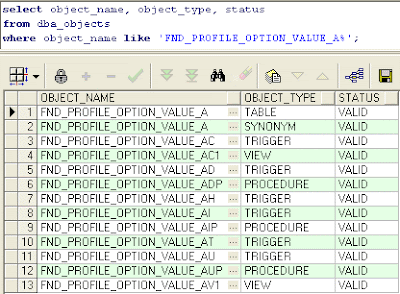
To make sure it works, we can check if all audit objects were created:


All audit objects names will be the first 26 characters of the audied table + suffix (_A, _AC, _AD...).
We can also run report “AuditTrail Report for Audit Group Validation” to make sure all audit objects created successfully.


Now let’s make a test to see how it works:
To test the audit on the profile's table, we will change a value for a profile (any profile) and check the shadow table (fnd_profile_option_value_a) for an audit inormation.

Navigate to: Profile -> System , and update the profile “FND: Diagnostics” (just for testing... you can choose any profile) to Yes.

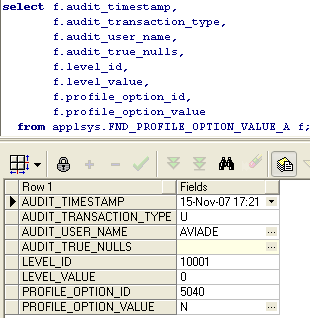
To see the audited data of the last change we can run this query:


The change was audited as expected...

As you can see, the “U” in the audit_transaction_type column indicates an update and the profile_option_value contain the value before update.

The audit_transaction_type could be:
1) U - update
2) D - delete
3) I - insert


How to disable Audit Trail?

The AuditTrail could be stopped by 3 ways:
1) Disable Prepare for Archive
2) Disable Interrupt Audit
3) Disable Purge Table

I've tried the third only… It deletes the data from the shadow table and drops all the audit objects from database.

1) Login to application and choose the System Administrator responsibility.
2) Security -> AuditTrail -> Groups
3) Query for your group
4) Update the Group State field to: “Disable – Purge Table”.
5) Run the “AuditTrail Update Tables” concurrent to make the changes.

That’s all about auditing…

You can read more at "Oracle Applications System Administrator’s Guide - Security Release 11i" - Chapter 5 - User and Data Auditing

To get my posts directly to your email, you can register for email subscription by using the box at the right side bar.

You are welcome to leave a comment.

Aviad

Tuesday, November 13, 2007

Audit users in Oracle Applications

We have 2 types of audit in Oracle Applications :
1) Audit users who sign on to Oracle Applications
2) Audit changed data in database

In this post I'm going to write about the first audit and the next post will be on the second type.

It's all begins with the "Sign-On:Audit Level" profile.
This profile can be set to one from four possible values at site level, and this is all what you need to do in order to enable it:
1) NONE – no audit enabled (Default value)
2) USER – audit user login to system, the logon time and the logoff time.
3) RESPONSIBILITY – audit all the above + which responsibilities the user chose and how long he stayed in each responsibility.
4) FORM – audit all the above + which forms the user used and how long he stayed in each form.

Each level populated an audit information tables:
1) USER – populates the FND_LOGINS table only.
2) RESPONSIBILITY – populates FND_LOGINS and FND_LOGIN_RESPONSIBILITIES tables.
3) FORM – populates FND_LOGINS, FND_LOGIN_RESPONSIBILITIES and FND_LOGIN_RESP_FORMS tables.

About those tables:

FND_LOGINS – holds information about users login to system, when and how long.
This table holds one row for each login.

FND_LOGIN_RESPONSIBILITIES – holds information about changes of responsibilities, when and how long being at each responsibility.
For each change this table holds one row with values that identify the user's login session, the user's current responsibility, and when the user is in the responsibility

FND_LOGIN_RESP_FORMS – holds information about using forms, when and how long.
This table holds one row for each form used in the same session with values that identify the user's login session, current responsibility, when and how long using each form.

In order to see the user audit information, there are 5 reports (concurrents) that you can use:
1) Signon Audit Concurrent Request
Show concurrent requests audit information – the user who run this request, when, from which responsibility and form, for all concurrent requests run in the system.

2) Signon Audit Forms
Show audit information about which user enter to which form, when and for how long.

3) Signon Audit Responsibilities
Show audit information about which user choose which responsibility, when and how long he stayed in each responsibility.

4) Signon Audit Unsuccessful Logins
Show audit information about unsuccessful logins to Oracle Applications.

5) Signon Audit Users
Show audit information about who sign on, when and for how long.


- In addition there is a monitor screen where you can see online data about users connected to system, which responsibility and form they are using and how long they are connected.
You can use this monitor from:
System Administrator responsibility -> security -> User -> Monitor.

- To inform users about unsuccessful logins to their account, you can set the “Sign-On:Notification” profile to Yes.


For more information about audit you can read "Oracle Applications System Administrator’s Guide - Security Release 11i" - Chapter 5 - User and Data Auditing

You are welcome to leave a comment.

Aviad

Monday, October 22, 2007

How to get details about patch applied in Oracle Applications by OAM & SQL?

There are some tables in oracle apps (AD tables especially) involved when applying patches.
Some of them are very useful when we need specific information about patch already applied.

I will show the main tables and afterwards some handy related SQL’s to retrieve patch applied details and how we can also get all this information via OAM.

AD_APPLIED_PATCHES – The main table when we are talking about patches that applied in Oracle Apps.
This table holds information about the "distinct" Oracle Applications patches that have been applied.
If 2 patches happen to have the same name but are different in content (e.g. "merged" patches), then they are considered distinct and this table will therefore hold 2 records (eTRM).
I also found that if the applications tier node is separate from the concurrent manager node, and the patch applied on both nodes, this table will hold 2 records, one for each node.

AD_PATCH_DRIVERS – This table holds information about all patch drivers included in specific patch.
For example if patch contain only one unified driver like u[patch_name].drv then ad_patch_drivers will hold 1 record.
On the other hand, if patch contain more than 1 driver, for example d[patch_name].drv and c[patch_name].drv, this table will hold 2 records.

AD_PATCH_RUNS – holds information about each execution of adpatch for a specific patch driver.
In case a patch contains more than one driver, this table will hold a record for each driver.
This table also holds one record for each node the patch driver has been applied on (column APPL_TOP_ID).

AD_PATCH_RUN_BUGS – holds information about all the bugs fixed as a part of specific run of adpatch.

AD_BUGS – this table holds information about all bug fixes that have been applied.


We have 2 options to view applied patch information:
1) via OAM – Oracle Applications Manager
2) Via SQL queries


With OAM it’s easy and very intuitive, from OAM site map -> “Maintenance” tab -> “Applied Patches” under Patching and Utilities.

Search by Patch ID will get all information about this patch; In addition, drill down by clicking on details will show the driver details.


For each driver we can use the buttons (Timing Details, Files Copied, etc.) to get more detailed information.

With SQL we can retrieve all the above information, sometimes more easily.

For example: How to know which modules affected by specific patch?

With OAM:
1) search patch by Patch ID
2) click on Details
3) For each driver click on “Bug Fixes” and look on product column.

With SQL:
Run the following query, it will show you all modules affected by specific patch in one click…

select distinct aprb.application_short_name as "Affected Modules"
from ad_applied_patches aap,
ad_patch_drivers apd,
ad_patch_runs apr,
ad_patch_run_bugs aprb
where aap.applied_patch_id = apd.applied_patch_id
and apd.patch_driver_id = apr.patch_driver_id
and apr.patch_run_id = aprb.patch_run_id
and aprb.applied_flag = 'Y'
and aap.patch_name = '&PatchName';


Another SQL will retrieve basic information regarding patch applied, useful when you need to know when and where (node) you applied specific patch:

select aap.patch_name, aat.name, apr.end_date
from ad_applied_patches aap,
ad_patch_drivers apd,
ad_patch_runs apr,
ad_appl_tops aat
where aap.applied_patch_id = apd.applied_patch_id
and apd.patch_driver_id = apr.patch_driver_id
and aat.appl_top_id = apr.appl_top_id
and aap.patch_name = '&PatchName';


To check if specific bug fix is applied, you need to query the AD_BUGS table only.
This table contains all patches and all superseded patches ever applied:

select ab.bug_number, ab.creation_date
from ad_bugs ab
where ab.bug_number = '&BugNumber';


For any question or additional information you are welcome to leave a comment...

Aviad