Following my last post about Audit users in Oracle Applications, in this post I’m going to talk about the Audit Trail - the data auditing feature in Oracle Applications.
The AuditTrail enable us to know who, when and what was changed on each table we would like to audit.
For example: Some of the profiles in Oracle Applications are very critical and important for normal activity of the system (like MO: Operating Unit).
We might be interested to know who changed the value of critical profiles and the Audit Trail certainly can help us.
Now I’ll show a step by step demo how to start Audit Trail on a table, I will go on with my previous example on the profiles table.
The table we would like to audit is FND_PROFILE_OPTION_VALUES.
1) Logon to system with System Administrator responsibility.
2) Make sure the profile “AuditTrail:Activate” is set to Yes
3) Check the audited table's owner
select owner
from dba_tables
where table_name like 'FND_PROFILE_OPTION_VALUES';
The owner is APPLSYS.
4) Check that audit is enabled for APPLSYS user
Go to: Security -> AuditTrail -> Install -> Query for APPLSYS

5) Define new Audit Group
Since the audit enabled on groups of tables, we should define a new Audit Group which will contain the FND_PROFILE_OPTION_VALUES table.
Find the table’s application name by this query:
select fav.application_name
from fnd_application_vl fav, fnd_tables ft
where fav.application_id = ft.application_id
and ft.table_name = 'FND_PROFILE_OPTION_VALUES';
The query result: Application Object Library
Navigate to: Security -> AuditTrail -> Groups
Application: Application Object Library
Audit Group: AC FND Profile Values Audit
Group State: Enable Requested

At this level, the columns that will be audited are the columns of the primary key or the first unique index on the audited table.
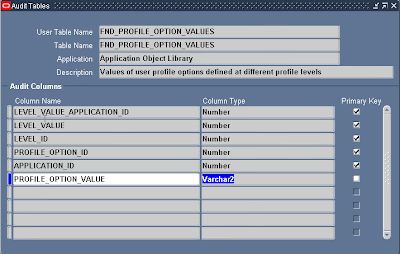
You can add columns to be audited as much as you want.
6) Check/Add column to audit
Navigate to: Security -> AuditTrail -> Tables
Query for FND_PROFILE_OPTION_VALUES table.
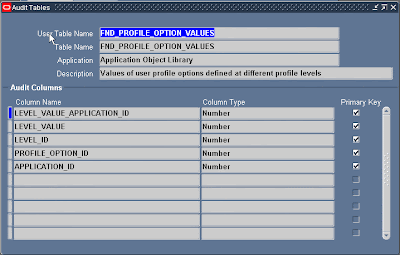
Add column PROFILE_OPTION_VALUE to be audited.
7) Run the “AuditTrail Update Tables” concurrent to enable the audit
Navigate to: Requests -> Run -> Single Request -> choose request name: “AuditTrail Update Tables” -> Submit
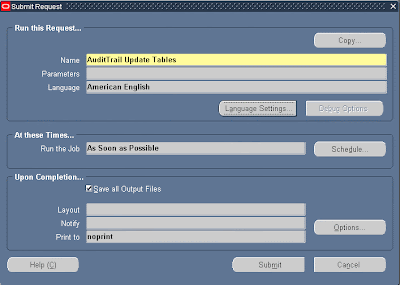
All definitions we made until here will not take effect until we execute this concurrent.
This concurrent will create all objects (triggers and procedures) required for audit, and views to retrieve the audited data.
This request should be executed each time we make changes in audit definitions, to generate new audit objects.
To make sure it works, we can check if all audit objects were created:
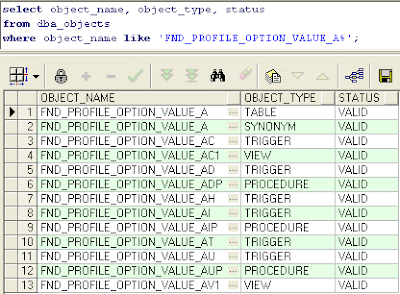
All audit objects names will be the first 26 characters of the audied table + suffix (_A, _AC, _AD...).
We can also run report “AuditTrail Report for Audit Group Validation” to make sure all audit objects created successfully.
Now let’s make a test to see how it works:
To test the audit on the profile's table, we will change a value for a profile (any profile) and check the shadow table (fnd_profile_option_value_a) for an audit inormation.
Navigate to: Profile -> System , and update the profile “FND: Diagnostics” (just for testing... you can choose any profile) to Yes.

To see the audited data of the last change we can run this query:
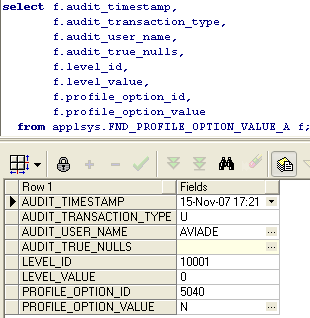
The change was audited as expected...
As you can see, the “U” in the audit_transaction_type column indicates an update and the profile_option_value contain the value before update.
The audit_transaction_type could be:
1) U - update
2) D - delete
3) I - insert
How to disable Audit Trail?
The AuditTrail could be stopped by 3 ways:
1) Disable Prepare for Archive
2) Disable Interrupt Audit
3) Disable Purge Table
I've tried the third only… It deletes the data from the shadow table and drops all the audit objects from database.
1) Login to application and choose the System Administrator responsibility.
2) Security -> AuditTrail -> Groups
3) Query for your group
4) Update the Group State field to: “Disable – Purge Table”.
5) Run the “AuditTrail Update Tables” concurrent to make the changes.
That’s all about auditing…
You can read more at "Oracle Applications System Administrator’s Guide - Security Release 11i" - Chapter 5 - User and Data Auditing
To get my posts directly to your email, you can register for email subscription by using the box at the right side bar.
You are welcome to leave a comment.
Aviad
|


12 comments:
Very well written!! Thanks for sharing with us.
Thanks for your comment Kalpit
Aviad
Avaid,
Its beautifully explained, Walking thorough is it wonderful.
Question i have is, we want to audit any custom table then we need to register that table using ADD_DD package and then define Audit group for that table and follow the rest of steps as mentioned.
Is my understanding correct.
Thanks
Thanks Shiva
Yes, you are right.
In order to audit custom tables you must first register them using AD_DD package and then follow the steps as mentioned.
Aviad
Thank you Aviad
Nice article.Simplfied,prety good.
very helpfull.
Aviad,
Very helpful information. Thanks.
Hi Aviad,
1. How to know the value of the data, before and after update the table?
In your sample below you just showed the value before update:
"the “U” in the audit_transaction_type column indicates an update"
"profile_option_value contain the value before update"
2. Is the AUDIT_USER_NAME row means the user name that has changed the value?
Thank you.
Regards,
Andy.
Thank you for your meaningful information.
Gloria
Hi Aviad
Is there any way to purge the old audit data without delete all the data ?
Hi Avaid,
My client want to enable auditing on certain tables. He wants to enable on certain tables for select statement also.
Is there a way where select any form/data can be audited in EBS 11i.
- Farhan
Hello. Thank you very much. I had enabled auditing at the site level and set auditing to FORMS. I am able to see the created shadow tables but I am still not finding the TERMINAL_ID value in FND_UNSUCCESSFUL_LOGINS_A and FND_LOGINS_A. What should I do ?
Thank you in advance.
Thank you very much
I found it very helpful
Post a Comment