Monday, December 22, 2008

Oracle Database Resource Manager 11g - Undocumented New Parameters

I've played around with Oracle Database Resource Manager in 10g and it's quite nice and might be very useful for high CPU usage systems, but I found the inability to limit I/O as a drawback since in most cases I've faced the need to limit I/O is more necessary than CPU limit.

When you have, let's say, 8 CPU's on your machine, you need all the 8 to be 100% utilized by Oracle sessions for the resource manager start limit sessions. However, if your machine I/O capabilities are 50 mbps, you need only one or two sessions which perform intensive I/O (batch job/heavy report) to make the database very heavy.

In Oracle Database 11g Release 1, Resource Manager has gotten some new features related to I/O. So I've installed the 11g, made some tests and found some interesting issues.

I'm not going to write about Resource Manager basics or about 11g enhancements as some great articles have already been published about it. For example, you can read Tim's blog post - "Resource Manager Enhancements in Oracle Database 11g Release 1"

But... I'm going to discuss one missing capability (in my opinion) that will hopefully be available with Oracle Database 11g Release 2 with 2 new parameters which have already available but inactive and undocumented.

For those who are not familiar with Oracle Database Resource Manager I'll try to give a short basic introduction:

Oracle Database Resource Manager helps us to prioritize sessions to optimize resource allocation within our database by:

  1. Creating groups of sessions (Consumer Groups) based on similar resource requirements
  2. Allocate resources to those groups (Resource Plan Directive)
  3. Resource Plan - is a container of Resource Plan Directives that allocate resources to Consumer Groups

Only one Resource Plan is active at a time.

When Oracle Database 11g was introduced, some new features for Resource Manager related to I/O have been revealed. Among them:

  1. I/O Calibration -
    New procedure which helps to assess the I/O capabilities of the database storage. The output of this procedure (CALIBRATE_IO) is max_iops, max_mbps and actual_latency.
     
  2. Per Session I/O Limits -
    Unlike previous versions, you can limit I/O requests (or I/O MB) for a session before it moved to a new consumer group. (switch_io_megabytes and switch_io_reqs have been added to CREATE_PLAN_DIRECTIVE procedure)
     

Oracle have added the option to "capture" Oracle sessions by the I/O requests or by the megabytes of I/O they issued in order to move them to a lower priority consumer group.

I have a very fundamental doubt about this enhancements as I don't get the meaning of "capturing" an intensive I/O session and move it to a low priority consumer group which can have only CPU limit ... ?!  The reason we "capture" this session is the amount of I/O it makes, and when we move it to a low priority consumer group we can just limit its CPU resources. We can't limit the amount of I/O for a Consumer Group.

It could have been very useful if Oracle had added the ability to limit I/O for a Consumer Group, like we can limit CPU (with mgmt_pN) for a Consumer Group. What is missing here is the ability to limit I/O for a specific Consumer Group in terms of Maximum I/O per second or Maximum megabytes per second.

Will Oracle enhance Resource Manager in 11g Release 2 to fulfill this capability?

I don't have a confident answer for this question but I assume they will.

While playing around I've noticed two new parameters to the CREATE_PLAN procedure - MAX_IOPS and MAX_MBPS. On first sight it looked like the answer to my question - the ability to limit I/O for session within a plan,

but it's not...

Those two parameter are undocumented and totally ignored in Oracle 11g Release 1 Documentation but available in 11g Release 1 database:

-- create a new resource plan
--
-- Input arguments:
--   plan                       - name of resource plan
--   comment                    - user's comment
--   cpu_mth                    - allocation method for CPU resources
--                                (deprecated)
--   active_sess_pool_mth       - allocation method for max. active sessions
--   parallel_degree_limit_mth  - allocation method for degree of parallelism
--   queueing_mth               - type of queueing policy to use
--   mgmt_mth                   - allocation method for CPU and I/O resources
--   sub_plan                   - whether plan is sub_plan
--   max_iops                   - maximum I/O requests per second
--   max_mbps                   - maximum megabytes of I/O per second
--

PROCEDURE create_plan(plan IN VARCHAR2,
                      comment IN VARCHAR2,
                      cpu_mth IN VARCHAR2 DEFAULT NULL,
                      active_sess_pool_mth IN VARCHAR2
                      DEFAULT 'ACTIVE_SESS_POOL_ABSOLUTE',
                      parallel_degree_limit_mth IN VARCHAR2 DEFAULT
                      'PARALLEL_DEGREE_LIMIT_ABSOLUTE',
                      queueing_mth IN VARCHAR2 DEFAULT 'FIFO_TIMEOUT',
                      mgmt_mth IN VARCHAR2 DEFAULT 'EMPHASIS',
                      sub_plan IN BOOLEAN DEFAULT FALSE,
                      max_iops IN NUMBER DEFAULT NULL,
                      max_mbps IN NUMBER DEFAULT NULL

                      );

I tried to create a new plan using one of these two parameters, but it returned an error for each value I tried.
It turned out that the only valid value to MAX_IOPS and MAX_MBPS is null.

begin
  dbms_resource_manager.create_plan(plan => 'PLAN_EX_1'
                                   ,comment => 'Plan Example 1'
                                   ,max_iops => 100);
end;
/
begin
*
ERROR at line 1:
ORA-29355: NULL or invalid MAX_IOPS argument specified
ORA-06512: at "SYS.DBMS_SYS_ERROR", line 86
ORA-06512: at "SYS.DBMS_RESOURCE_MANAGER", line 38
ORA-06512: at line 2

I've confirmed it with Oracle support and their answer was:

"This is currently an expected behaviour, we can not explicitly set either max_iops or max_mbps to any value other than null, that's why these parameters are currently not included in the documentation."

So here is my guess:
It looks like Oracle are going to enhance Resource Manager to allow I/O limit, but unlike CPU limit through Plan Directive (mgmt_pN), it's going to be a limit in Plan level, so you can create a sub plan with limited I/O resources allocated. Maybe the allocation method parameter (mgmt_mth) will get more valid options except for EMPHASIS and RATIO.

I'll keep track of it as soon as Oracle Database 11g Release 2 will be announced and I'll update.

You are welcome to leave a comment and/or share your opinion about this topic.

Aviad

Thursday, November 13, 2008

How to enable SSL for Agile Proxy server

Following the last post about Agile PLM - Web Proxy Server Installation, in this post I'll show how to enable SSL for Agile Proxy server to make Web access to Agile more secure.

Apply the SSL certificate

  1. Have a signed SSL certificate file (.pfx file) from a Well-known Certificate Authorities (such as VeriSign)
  2. Login to the Agile Proxy server with administrator user
  3. Navigate to: Start -> Administrative Tools -> Internet information services (IIS) Manager
  4. Right click on Agile PLM Web Site -> properties -> Select the Directory Security tab

  5. Click on Server Certificate -> next

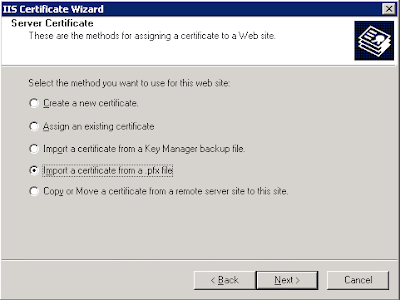
  6. Select Import a certificate from a .pfx file -> next

  7. Enter Path and file name of the certificate file (.pfx file) -> next

  8. Enter the password for the certificate -> next

Update the iFS_External File Manager

  1. Open the Agile Java Client
  2. Select 'Admin' Tab -> expand 'Server Settings' -> open 'Locations'
  3. Select the 'File Manager' tab -> Double click on the iFS_External file manager.
  4. Update the File Manager URL from http://... to -> https://...

Now you can login to Agile through the Agile Proxy server via https://servername.domain/Agile/PLMServlet.

When you'll try to work with files (get file or add new) you might encounter the following error:

"The preferred file server : https://servername.domain/Filemgr/AttachmentServlet for user : UserName is down. Please contact the system administrator."

You'll although see the following error within OC4J~home~defaulet~island~1 (at [OASHome]/opmn/logs):

08/09/23 10:23:11 javax.net.ssl.SSLHandshakeException: sun.security.validator.ValidatorException: No trusted certificate found
08/09/23 10:23:11     at com.sun.net.ssl.internal.ssl.BaseSSLSocketImpl.a(DashoA12275)
08/09/23 10:23:11     at com.sun.net.ssl.internal.ssl.SSLSocketImpl.a(DashoA12275)
08/09/23 10:23:11     at com.sun.net.ssl.internal.ssl.SunJSSE_az.a(DashoA12275)
.....
.....


The reason for this error is the certificate for root authority that is not installed on the OAS.

The solution is to import Root CA certificate in the JDK embedded inside OAS:

  1. Open a web browser and access the Agile web client via https://...
  2. Double click on the padlock in the lower right corner of the browser window

  3. Select Details and then select the "Copy to File" button

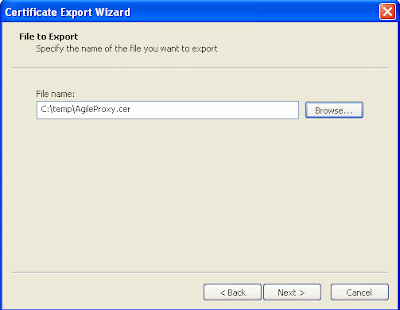
  4. Answer the prompts using the defaults and select a filename for the .cer file.


  5. Open a command window (Start -> Run -> cmd)
  6. Navigate to the [OASHome]\jdk\bin directory
  7. Type the following command:

    keytool -import -keystore [OASHome]\jdk\jre\lib\security\cacerts -file c:\temp\AgileProxy.cer
  8. When prompted for the Certificate store password type changeit and then hit Enter

  9. When prompted to load the certificate, type yes and hit enter

  10. Restart OAS

Related: Note 569235.1 - Unable to add or get file attachments because OAS cannot recognize SSL Cert loaded on Proxy server

You are welcome to leave a comment..

Aviad

Tuesday, October 7, 2008

Agile PLM - Web Proxy Server Installation

It has been a while since I've posted about Agile PLM stuff..

In this post I'll go through implementing and configuring an Oracle Agile PLM Web Proxy Server.

Previous related posts:

Agile PLM 9.2.2.1 - Part I - Introduction
Agile PLM 9.2.2.1 – Part II – Database Node Installation
Agile PLM 9.2.2.1 – Part III – Application Node Installation


First, who needs a Web Proxy server for Agile PLM?

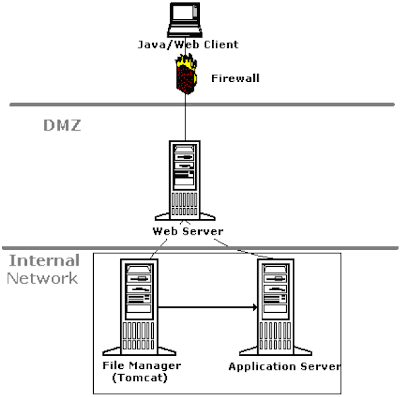
In order to make Agile PLM accessible to external users, a Web Proxy server should be installed to allow connections from the internet.
This solution include a new server on DMZ behind a firewall which forwards calls to the internal Agile application server.

(* Image from Oracle Agile documentation)

The Agile Web Proxy Server installation consists of the following steps:

  • Installing and Configuring the IIS
  • Install the Agile Web proxy files on the IIS server in the DMZ
  • Configuring IIS as a Proxy Server for Agile PLM
  • Configuring IIS as a Proxy Server for Agile File Manager
  • Create new external File Manager
     

Now I'll show a detailed procedure to install Agile Web Proxy Server on Windows using IIS (Microsoft Internet Information Server).
*** When installing on Unix/Linux OS you'll use Apache as the web proxy server.

Installing and Configuring the IIS

  1. Install IIS on the new Agile Proxy Server (will be called agiledmz)
  2. Login to agiledmz server with administrator user
  3. Navigate to: Start -> Administrative Tools -> Internet information services (IIS) Manager
  4. Right click on Web Sites -> new -> Web Site -> Next


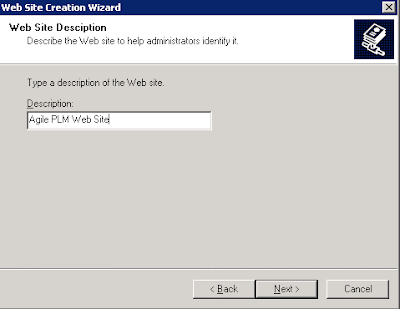
  5. Enter description: Agile PLM Web Site -> Next
     
  6. Enter the following:
    Ip: All unussigned
    port: 80
    host: null -> Next
  7. Path: C:\Inetpub\wwwroot -> Next
     
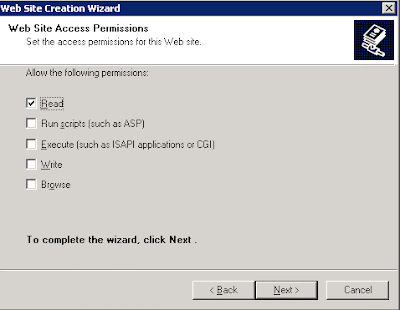
  8. Check the Read option only -> Next
     
  9. Click Finish  
  10. Right click on Agile PLM Web Site -> properties
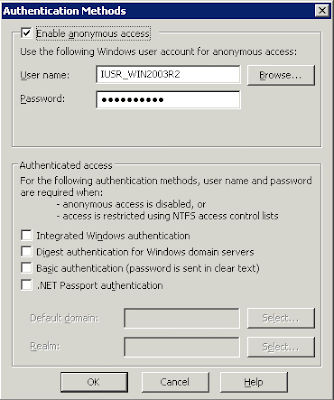
  11. Select tab Directory Security -> Under 'Authentication and Access Control' click on Edit -> Uncheck the 'Integrated Windows authentication'
     
  12. Disable the default Web Site:  Right Click on Defaule Web Site -> Stop
     

Install the Agile Web proxy files on the IIS server in the DMZ

  1. Make sure IIS is up and running (Go to services screen - services.msc - and check that "IIS Admin Service" process is in Started state)
     
  2. Execute setup.exe from [INSTALLATION_BASE_DIR]\PN00168\Windows directory
     
  3. Click Next -> accept the license -> Next
     
  4. Enter User name, Company name and License key -> Next
     
  5. Check the Web Proxies only -> Next
     
  6. Specify directory on which agile files will be installed (D:\Agile\Agile9221)-> Next
     
  7. Select Oracle Application Server 10g -> Next
     
  8. Enter the Web Proxy server name (or IP) and port (80) -> Next
     
  9. Enter the server name and port on which Agile application is installed (The Agile Application Server) -> Next
     
  10. Keep the default "Agile" for Agile Application Server Virtual Path-> Next
     
  11. Keep the default "Use internal user account (ifsuser)" -> Next
     
  12. Keep the default "Filemgr" for Agile Primary File Manager’s Virtual Path -> Next
     
  13. Enter Agile's File Manager host name and port (might be the same as Agile Application Server)-> Next
     
  14. Click on Install
  15. Click on Done
     

Configuring IIS as a Proxy Server for Agile PLM

  1. Navigate to: Start > Administrative Tools > Internet Information Services (IIS) Manager
  2. Right click on Agile PLM Web Site -> properties
  3. Click the Home Directory tab -> update the execute permissions to Scripts and Executables
     
  4. Click the ISAPI Filter tab -> click Add 
  5. Filter name: oproxy , Executable: D:\Agile\Agile9221\AgileProxies\oracle_proxy.dll -> Ok -> Ok
     
  6. Right click on Agile PLM Web Site -> New -> Virtual Directory -> Next
     
  7. Alias: oproxy -> Next
     
  8. Path: D:\Agile\Agile9221\AgileProxies -> Next
     
  9. Check the Read and Execute -> Next -> Finish
     
  10. Select the Web Service Extensions -> Select the All Unknown ISAPI Extensions -> Click Allow -> Click Yes
     
  11. Close IIS Manager window
  12. Restart IIS from services screen
  13. Right Click on Agile PLM Web Site -> properties -> select the ISAPI Filters tab -> you should see a green arrow pointing up for oproxy.


Configuring IIS as a Proxy Server for Agile File Manager

  1. Login to the File Manager server
  2. Note the Connector Port number from [AGILE_HOME]\Tomcat\conf\server.xml
     
    <!-- Define a Coyote/JK2 AJP 1.3 Connector on port 8009 -->
        <Connector port="8009" enableLookups="false" redirectPort="8443" debug="0" protocol="AJP/1.3"/>
  3. Edit jk2.properties from [AGILE_HOME]\Tomcat\conf
    Add the following line at the end and save the file:

    channelSocket.port=8009
       

  4. Login to agiledmz - (The Web Proxy Server)
  5. Navigate to: Start > Administrative Tools > Internet Information Services (IIS) Manager
  6. Right click on Agile PLM Web Site -> properties
  7. Click the ISAPI Filter tab -> click Add
  8. Filter name: Jakarta IIS Connector , Executable: D:\Agile\Agile9221\AgileProxies\isapi_redirect.dll -> Ok -> Ok
     
  9. Right click on Agile PLM Web Site -> New -> Virtual Directory -> Next
     
  10. Alias: Jakarta -> Next
  11. Path: D:\Agile\Agile9221\AgileProxies -> Next
  12. Check the Read and Execute -> Next -> Finish
     
  13. Open the workers.properties file in [AGILE_HOME]\AgileProxies and make sure the File Manager server is correct in the following entry:
     
    worker.ajp13w.host=<File Manager host name>
       
  14. Restart IIS 
  15. Right Click on Agile PLM Web Site -> properties -> select the ISAPI Filters tab -> you should see green arrows pointing up for both oproxy and jakarta.


Create new external File Manager

  1. Open the Agile Java Client
  2. Select 'Admin' Tab -> expand 'Server Settings' -> open 'Locations'
  3. Select the 'File Manager' tab -> click on the 'new' icon (you must have license for unlimited File Managers to enable it)
  4. Enter the following:
    Name - iFS_External
    File Manager URL - Use the web proxy server name (registered on the web) or IP, e.g. http://agile.company.domain/Filemgr/AttachmentServlet or http://111.11.11.111/Filemgr/AttachmentServlet
    Enabled - Yes
    Primary File Server - No
     
  5. Click on 'Ok'
  6. Expand the 'User Settings' -> open 'Users' -> find the user you want to use the external iFS and open his settings -> select the 'Preferences' tab -> update the 'Preferred File Manager' to 'iFS_External'.
     

*** Important Note
Agile architecture compels you to configure specific File Manager for each user.
Users configured to use the internal iFS will be able to utilize the File Manager from within the network only! They'll be unable to utilize the external iFS when login to Agile through the Agile Web Proxy Server.
The same behaviour for users configured to use the external iFS - They will be able to utilize the external iFS only.

 
Now you can login to agile from the internet through the Agile Web Proxy Server.
Use the following URL to get the login screen:  
http://[Agile Web Server Proxy IP or Name]/Agile/PLMServlet

Next post I'll show how to secure connections to Agile through the Proxy server using SSL (https) connection.

You are welcome to leave a comment and/or share your experience with Agile installation.

Aviad

Sunday, August 24, 2008

Developer 6i Patch Set 19 upgrade with EBS 11i

It has been more than two years since the last Developer 6i patchset 18 was certified with Oracle E-Business Suite Release 11i, and now, Developer 6i patchset 19 (6.0.8.28) is certified with Oracle Apps 11i.

Actually, since we migrated from Jinitiator to Java JRE 1.6, we've encountered some frustrating mouse focus issues, I really hope they were fixed with this patch and won't appear after upgrade.

Like with the last patch set, I'll bring you "step-by-step" upgrade instructions for linux deployments.
Other Operation Systems's need another patches - see Note 125767.1 - Upgrading Developer 6i with Oracle Applications 11i.

*** All patches must be installed on all Application tier nodes

  1. Stop all application processes by adstpall.sh
     
  2. Apply the latest certified Developer 6i patch set 19 (6194129) 
    - Source applications environment (e.g source .../testappl/APPSORA.env) 
    - Verify that $ORACLE_HOME is the 806_ORACLE_HOME
    - Execute with applmgr user
    $ unzip p6194129_60828_LINUX.zip
    $ cd developer6i_patch19
    $ ./patch_install.sh 2>&1 | tee patch_install_p19.log
           
    - Check patch_install_p19.log for any errors
    - Execute the following to relink Procedure Builder, Forms, Graphics and Reports
    $ cd $ORACLE_HOME/procbuilder60/lib; make -f ins_procbuilder.mk install
    $ cd $ORACLE_HOME/forms60/lib;       make -f ins_forms60w.mk install
    $ cd $ORACLE_HOME/graphics60/lib;    make -f ins_graphics60w.mk install
    $ cd $ORACLE_HOME/reports60/lib;     make -f ins_reports60w.mk install
             
  3. Apply patch 7156414 
    - Unzip patch file
    $ unzip p7156414_60828_GENERIC.zip
           
    - Backup old files
    $ cp -r $ORACLE_HOME/forms60/java/oracle/forms/handler/UICommon.class $ORACLE_HOME/forms60/java/oracle/forms/
    handler/UICommon.class.PRE_BUG7156414
    $ cp -r $ORACLE_HOME/forms60/java/oracle/forms/handler/ComponentItem.class $ORACLE_HOME/forms60/java/oracle/forms/
    handler/ComponentItem.class.PRE_BUG7156414
    $ cp -r $ORACLE_HOME/forms60/java/oracle/forms/handler/BlockScroller.class $ORACLE_HOME/forms60/java/oracle/forms/
    handler/BlockScroller.class.PRE_BUG7156414
    $ cp -r $ORACLE_HOME/forms60/java/oracle/forms/handler/FormCanvas.class $ORACLE_HOME/forms60/java/oracle/forms/
    handler/FormCanvas.class.PRE_BUG7156414
    $ cp -r $ORACLE_HOME/forms60/java/oracle/forms/handler/FormWindow.class $ORACLE_HOME/forms60/java/oracle/forms/
    handler/FormWindow.class.PRE_BUG7156414
    $ cp -r $ORACLE_HOME/forms60/java/oracle/forms/ui/VBean.class $ORACLE_HOME/forms60/java/oracle/forms/
    ui/VBean.class.PRE_BUG7156414
            
    - Copy patch files to appropriate directories
    $ cd [PATCH_TOP]/7156414/oracle/forms/handler
    $ cp UICommon.class      $ORACLE_HOME/forms60/java/oracle/forms/handler/UICommon.class
    $ cp ComponentItem.class $ORACLE_HOME/forms60/java/oracle/forms/handler/ComponentItem.class
    $ cp BlockScroller.class $ORACLE_HOME/forms60/java/oracle/forms/handler/BlockScroller.class
    $ cp FormCanvas.class    $ORACLE_HOME/forms60/java/oracle/forms/handler/FormCanvas.class
    $ cp FormWindow.class    $ORACLE_HOME/forms60/java/oracle/forms/handler/FormWindow.class

    $ cd [PATCH_TOP]/7156414/oracle/forms/ui
    $ cp VBean.class         $ORACLE_HOME/forms60/java/oracle/forms/ui/VBean.class


    - Regenerate Jar files
      - Execute adadmin
      - Select the "Generate Applications Files menu" option
      - Select "Generate product JAR files"
      - Do you wish to force regeneration of all jar files? => Yes
      - Spot check that the JAR files have been generated by verifying the timestamp    
    $ cd $OA_JAVA/oracle/apps/fnd/jar
    $ ll fndforms.jar fndewt.jar
             
  4. Apply patch 6125732
    - Unzip patch file + Apply patch
    $ unzip p6125732_60828_LINUX.zip
    $ cd 6125732
    $ sh patch.sh
           
  5. Apply patch 6857221
    - Unzip patch file + Apply patch
    $ unzip p6857221_60828_LINUX.zip
    $ cd 6857221
    $ sh patch.sh
           
    - Relink f60webmx for Oracle Applications
    $ adrelink.sh force=y "fnd f60webmx"
           
  6. Apply patch 3830807
    - Unzip patch file + Apply patch
    $ unzip p3830807_8063_LINUX.zip
    $ cd 3830807
    $ ./patch.sh
           
    - Relink all Applications executables:
      adadmin -> "Maintain Applications Files" -> "Relink Applications programs"
     
  7. Apply patch 4586086
    - Unzip patch file
    $ unzip p4586086_600_LINUX.zip
           
    - Backup old file
    $ cd $ORACLE_HOME/forms60/lib
    $ mv env_forms60.mk env_forms60.mk.PRE_BUG4586086
           
    - Copy patch file to the appropriate directory
    $ cd [PATCH_HOME]/bug4586086
    $ cp env_forms60.mk $ORACLE_HOME/forms60/lib

    - Generate shared object + Relink f60webmx for apps
    $ cd $ORACLE_HOME/forms60/lib
    $ make -f cus_forms60w.mk libso_install
    $ adrelink.sh force=y "fnd f60webmx"
            
  8. Relink applications executables
    - Run adadmin
    - Select (2) "Maintain Applications Files Menu"
    - Select (1) "Relink Applications programs"
    - List of product to link: fnd
    - Generate specific executables …: Yes
    - Relink with debug: No
    - Enter executables to relink: f60webmx ar60run ar60runb ar60rund
     
  9. Apply patch 7343387 (Apps Interoperability)
    - Unzip patch file
    $ unzip p7343387_11i_GENERIC.zip
           
    - Enable maintenance mode: adadmin -> (5) Change Maintenance Mode -> (1) Enable Maintenance Mode
    - apply patch with adpatch
    - Disable maintenance mode: adadmin -> (5) Change Maintenance Mode -> (2) Disable Maintenance Mode
     
  10. Verify your upgrade
    - Check the timestamp for the following files:
    $ cd $OA_JAVA/oracle/apps/fnd/jar
    $ ll fndforms.jar fndewt.jar
            
    If the timestamp is not current - run adadmin => Maintain Applications Files => Generate Product JAR Files. 
     
  11. Start all applications processes (adstrtall.sh)
    - You can also verify your upgrade by login to forms responsibility -> Help -> About Oracle Applications
      You should see: Oracle Forms version : 6.0.8.28.0
     

Related - Note 125767.1 - Upgrading Developer 6i with Oracle Applications 11i.

You are welcome to leave a comment

Thursday, August 7, 2008

How to Configure OEM 10g Database Control after Clone

After cloning an EBS environment I had tried to start the OEM 10g Database Control (DBConsole) and I got this message:

[oratest@testsrv1 ~]$ emctl start dbconsole
TZ set to Israel
OC4J Configuration issue.
/oracle/test/db/testdb/10.2/ oc4j/j2ee/OC4J_DBConsole_testsrv1.domain_TEST not found.

However, it was an acceptable message since DB Console wasn't configured to this instance yet.

Using emca I've tried to recreate the DB Control configuration files as follow:

[oratest@testsrv1 ~]$ emca -config dbcontrol db

...
INFO: Database Control started successfully
...
INFO: >>>>>>>>>>> The Database Control URL is http://testsrv1.domain:5500/em <<<<<<<<<<<
Enterprise Manager configuration completed successfully

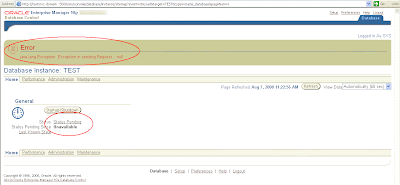
Well, I thought it looks fine, but when I opened the DB Console I saw this message at the top of the page: 

error:
java.lang.Exception: Exception in sending Request :: null

After some research, logs digging and Metalink searches, I found that the Agent component should be relinked manually.
But before there are two issues in env_sysman.mk file that should be fixed before executing the relink command.

I will show my actions step by step:

  1. Stop DB Console:
    emctl stop dbconsole
     
  2. cd $ORACLE_HOME/sysman/lib
     
  3. Edit env_sysman.mk and look for "JRE_LIB_DIR"
    In my instance JRE_LIB_DIR was populated with the old environment name..
    I changed it from:
    JRE_LIB_DIR=/oracle/prod/db/proddb/10.2/jdk/jre/lib/i386
    To:
    JRE_LIB_DIR=/oracle/test/db/testdb/10.2/jdk/jre/lib/i386
     
  4. One more issue for env_sysman.mk, look for "$(LIBNMEM)  $(LIBNMER)"
    And change from:
    $(LIBNMEM)  $(LIBNMER) \
    To:
    $(LIBNMEM)  $(LIBNMER) $(LIBNMO) \
     
  5. Now relink the Agent component by issuing this command:
    make -f ins_sysman.mk agent
     
  6. Recreate the DB Control configuration files (Again, even if you did it before)
    emca -config dbcontrol db

Following this procedure will make the DBConsole configured and work for the new cloned instance.